Desserts
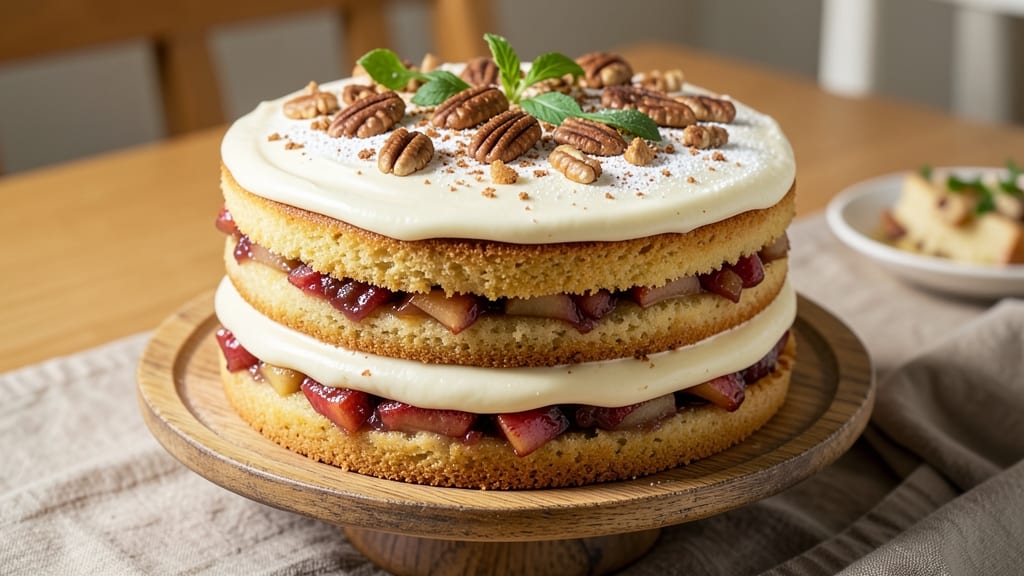
This apple Betty cake recipe delivers the perfect balance of warm spiced apples, tender layers, and a buttery streusel topping that makes every bite feel like autumn in a slice. 🍏 The secret lies in soaking the apples in lemon juice to prevent browning while preserving their natural sweetness—this simple step transforms mushy fruit into tender, flavorful filling that pairs beautifully with the creamy cake layers.
What sets this recipe apart is the foolproof layering technique: a moist vanilla cake base, a spiced apple filling that stays juicy, and a crumbly streusel topping that bakes to golden perfection.
Unlike traditional apple cakes, this version uses a two-layer approach for texture contrast, ensuring each bite delivers both cake and apple in harmony. The result? A dessert that’s rich yet not overly sweet, with warm cinnamon and nutmeg notes that linger.
Baking at 350°F for about 40 minutes ensures the cake rises evenly while the streusel develops that signature crispy texture. The cooling process is just as important—allowing the cake to rest for at least 30 minutes before slicing guarantees clean layers and prevents crumbling.
Serve warm with a drizzle of caramel or vanilla ice cream for the ultimate comfort dessert.
Perfect for holiday gatherings, brunch menus, or cozy weeknight treats, this Betty cake adapts easily with optional add-ins like walnuts or a lemon glaze. The recipe scales well for crowds, and leftovers reheat beautifully. Here’s how to bake it to perfection every time.
Ingredients for apple betty cake
Warm spices, juicy apples, and buttery layers—this cake needs just 14 ingredients for autumn perfection.
| Ingredient | Amount | Notes |
|---|---|---|
| All-Purpose Flour 🌾 | 2 ½ cups | Sifted for fluffiness |
| Granulated Sugar 🍚 | 1 ½ cups | White or light brown |
| Unsalted Butter 🧈 | 1 cup | Cold, cubed for streusel |
| Large Eggs 🥚 | 2 whole | Room temperature |
| Vanilla Extract 🌸 | 1 tbsp | Pure alcohol-free preferred |
| Baking Powder 🧂 | 2 tsp | Aluminum-free for best rise |
| Salt 🧂 | ½ tsp | Fine sea salt |
| Ground Cinnamon 🌿 | 1 tbsp | Freshly ground preferred |
| Granny Smith Apples 🍏 | 4 medium | Peeled, cored, diced |
| Lemon Juice 🍋 | 2 tbsp | Freshly squeezed |
| Ground Nutmeg 🌿 | ¼ tsp | Freshly grated |
| Old-Fashioned Oats 🌾 | 1 cup | Quick or rolled oats |
| Light Brown Sugar 🍚 | ½ cup | Packed firmly |
| Chopped Walnuts 🌰 | ½ cup | Optional for crunch |
The apples are everything here. Granny Smiths stay crisp when soaked in lemon juice, but Honeycrisp or Fuji work too—just mix them for texture. I grab mine from Trader Joe's when they're in season, or Costco has pre-washed organic ones that save time. For the streusel, old-fashioned oats give that perfect crunch—quick oats work too, but they get gummy. The butter? Cold and cubed is key for flaky layers; don't melt it or you'll lose that magic. Walnuts are optional but add a lovely crunch that pairs with the apples.
No Granny Smiths? Mix Honeycrisp and Fuji for sweet-tart balance. Short on oats? Crushed graham crackers or panko work in a pinch. The vanilla extract can be imitation if that's what you've got, but alcohol-free pure vanilla has better flavor. For the cake layers, brown sugar in the dry ingredients keeps them moist longer. And if you're feeling fancy, swap half the flour for whole wheat flour—just add an extra teaspoon of baking powder to compensate. The lemon juice is non-negotiable though; it's what keeps those apples bright and juicy.
This cake tastes even better the next day—cover tightly and store at room temp for up to 3 days, or freeze slices for 3 months. I always make a double batch because it disappears fast. For reheating, wrap slices in foil and warm at 350°F for 10 minutes. The streusel topping stays crispy if you reheat it covered, then uncover for the last minute to crisp up. Serve with vanilla ice cream or a drizzle of caramel for the full experience.
Why You'll Love This Recipe
- No Fuss Layers: I swear by the simplicity of this one—just mix, bake, repeat. The buttercream layers are foolproof (no piping skills needed), and the apples fold right into the batter like a warm hug.
- Vanilla-Apple Magic: That vanilla extract isn’t just flavoring—it’s the secret handshake between the apples and the cake. Sweet, spiced, and just a little tangy when the apples caramelize? It’s the kind of flavor that makes you pause mid-bite.
- Weeknight Hero: Between us, this is my go-to for school lunches or impromptu coffee dates. Slice it, wrap it in parchment, and it stays fresh for days—no weird aftertaste, just pure apple-cake joy.
- Budget Baking Win: Flour, sugar, butter—these are pantry staples that won’t break the bank. And honestly? A single batch feeds four for breakfast or dessert, so you’re basically getting two meals for the price of one. Smart move.
Step-by-step instructions for apple Betty cake
Here's how to layer that perfect creamy cake with warm spiced apple streusel—every bite is pure comfort!
👨🍳 Step 1: Prep the Apples and Make the Streusel
Start by peeling, coring, and dicing the 4 medium Granny Smith Apples into ¼-inch cubes. Toss them with the 2 tablespoons Lemon Juice and set aside—this prevents browning and adds brightness. In a separate bowl, whisk together the 1 cup Old-Fashioned Oats, 0.5 cup Light Brown Sugar, 0.5 cup Chopped Walnuts, 1 tablespoon Ground Cinnamon, 0.25 teaspoon Ground Nutmeg, and 0.5 teaspoon Salt.
Cut the 1 cup Unsalted Butter into small cubes and mix it into the dry streusel mixture using a fork or your fingers until it resembles coarse crumbs with pea-sized butter pieces. This texture is key—it'll create that perfect crunchy-topped, gooey-bottomed streusel. Keep this mixture in the fridge while you make the cake batter.
🍳 Step 2: Create the Creamy Cake Layers
Preheat your oven to 350°F and grease two 9-inch round cake pans or line them with parchment paper. In a large mixing bowl, whisk together the 2.5 cups All-Purpose Flour, 1.5 cups Granulated Sugar, 2 teaspoons Baking Powder, and 0.5 teaspoon Salt. Sift the flour mixture once more to aerate it—this ensures light, tender layers.
In a separate bowl, beat the 2 whole Large Eggs until just combined, then mix in the 1 tablespoon Vanilla Extract. Gradually pour the wet ingredients into the dry ingredients while mixing on low speed until just combined. Be careful not to overmix—you want a smooth batter with no flour streaks. Divide the batter evenly between the prepared cake pans.
🥘 Step 3: Assemble and Bake the Layers
Bake the cake layers for 25-30 minutes or until a toothpick inserted into the center comes out clean. While they bake, drain any excess liquid from the prepared apples and spread them evenly over the first cake layer. Sprinkle half of the streusel mixture over the apples, then gently place the second cake layer on top.
Cover the top layer with the remaining streusel mixture, pressing down lightly to ensure good contact. Bake the assembled cake for an additional 20-25 minutes until the streusel is golden brown and the cake is fully set. The top should look beautifully crisp while the layers underneath stay tender and moist.
⏰ Step 4: Cool and Serve for Maximum Creaminess
Let the cake cool in the pans for 10 minutes, then transfer it to a wire rack to cool completely. This resting period is crucial—it allows the layers to set properly and prevents the cake from becoming soggy. Serve warm for that perfect contrast between the creamy cake layers and the warm, spiced apple streusel.
Slice into wedges and enjoy immediately. The cake should have a delicate, fluffy texture with a subtle cinnamon-nutmeg aroma, while the streusel delivers bursts of buttery oat crunch and tender apple pieces. For extra decadence, dust with powdered sugar or serve with vanilla ice cream!
Pro Tips For Making Apple Betty Cake
- Weigh Your Butter: I learned this the hard way—measuring butter by volume gives you a guess, not a guarantee. Use a kitchen scale for 225g (1 cup packed) of cold, cubed butter; it’ll create those perfect flaky layers the recipe depends on.
- Prep Apples Last: Slice your apples right before folding them into the batter—no waiting. Oxidation turns them mushy and watery, which ruins the cake’s texture. Keep them in cold water with a splash of lemon juice until ready.
- Don’t Overmix: After adding the flour, stop mixing the moment it’s just combined. Overworking the batter makes the cake dense instead of tender. Two or three turns with a spatula is all you need.
- Use Room-Temp Eggs: Cold eggs from the fridge won’t blend smoothly with the butter and sugar. Let them sit in warm water for 5 minutes first—the batter will be lighter and easier to fold. Trust me, it’s worth the wait.
Pro cooking tips for perfect results
Streusel Texture Secrets
The streusel topping is where the magic happens—cold butter cubes are non-negotiable for that perfect crumbly texture. Cut your 1 cup unsalted butter into pea-sized pieces and mix them into the dry ingredients using a fork until you get pea-sized butter flecks (not fully melted).
This creates pockets of steam during baking that make the streusel crispy on top and tender underneath. I like to keep the streusel mixture chilled while baking the cake layers to prevent it from getting too soft. 🌟
Apple Prep Matters
Don’t skip the lemon juice soak—tossing the diced apples with 2 tablespoons fresh lemon juice prevents browning and keeps them bright and juicy. For even better texture, pat the apples dry after soaking to remove excess moisture, which can make the cake layers soggy.
I also recommend peeling the apples unless you prefer a rustic look, as the skin can make the filling too fibrous. Use a mandoline for even ¼-inch cubes if you’re feeling fancy, or a sharp knife works just fine. 🍏
Baking Time Precision
Bake the cake layers separately for 25-30 minutes until a toothpick comes out clean, but don’t overbake—they’ll firm up more as they cool. When assembling, spread the apple filling evenly and press the second layer gently to avoid gaps.
The final bake time of 20-25 minutes is critical: the streusel should be golden brown, but the cake underneath should still be tender. A toothpick inserted into the center should come out with a few moist crumbs, not wet batter. 🔥
Cooling for Clean Slices
Let the cake cool 10 minutes in the pan before transferring to a wire rack—this prevents crumbling when you slice. For perfectly clean layers, wait until the cake is completely cool (about 1 hour) before serving.
If you’re short on time, chill the cake in the fridge for 30 minutes to set the layers faster. The contrast between the warm streusel and cool cake is what makes this dessert irresistible. 💛
Equipment Shortcuts
No 9-inch cake pans? Use 8-inch pans and reduce the batter by 20%—just bake for 5-10 minutes longer. For even baking, place a baking sheet on the rack below your pans to catch drips.
A pastry brush helps spread any extra egg wash over the streusel for extra shine. And if you’re worried about overmixing the batter, use a hand mixer on low speed—it’s harder to overwork the batter this way. ✨
Make-Ahead Magic
This cake tastes even better the next day—store it at room temperature in an airtight container for up to 3 days, or freeze slices for 3 months.
To reheat, wrap slices in foil and warm at 350°F for 10 minutes—this keeps the streusel crispy while melting the cake layers slightly. For a restaurant-worthy finish, dust with powdered sugar or drizzle with warm caramel sauce before serving. 💫
Nutrition facts
Frequently asked questions
Why do the apples need lemon juice?
The 2 tablespoons lemon juice serves two key purposes: it prevents the apples from browning while prepping, and it brightens their natural sweetness. Without it, the apples release moisture that can make the cake layers soggy. This simple step keeps your filling vibrant and juicy, not mushy!
Can I make this cake in a single layer instead of two?
Yes! For a single-layer version, bake just one 9-inch cake layer for 25-30 minutes, then spread the apple filling and streusel on top. Bake an additional 20-25 minutes until golden. This works well for smaller gatherings or if you prefer a taller cake. The texture will be slightly different but still delicious.
What's the best way to store leftovers?
Keep the cake at room temperature in an airtight container for up to 3 days—it actually tastes better the next day! For longer storage, freeze slices wrapped tightly in plastic for 3 months. To reheat, wrap slices in foil and warm at 350°F for 10 minutes to maintain that perfect streusel crunch.
How do I adjust this for a gluten-free version?
Replace the 2.5 cups all-purpose flour with a 1:1 gluten-free baking flour blend (like Bob's Red Mill) plus 1 extra teaspoon baking powder to compensate for reduced lift. Use the same measurements for other ingredients. For the streusel, gluten-free oats work well, but check labels to ensure they're certified gluten-free.
Can I use canned apples instead of fresh?
Fresh apples are ideal for their texture, but you can use unsweetened canned apple pie filling in a pinch. Drain it well and pat dry to remove excess moisture, which prevents soggy layers. Reduce the sugar in the filling by 2 tablespoons since canned apples are often pre-sweetened. The flavor will be slightly different but still delicious!