Desserts
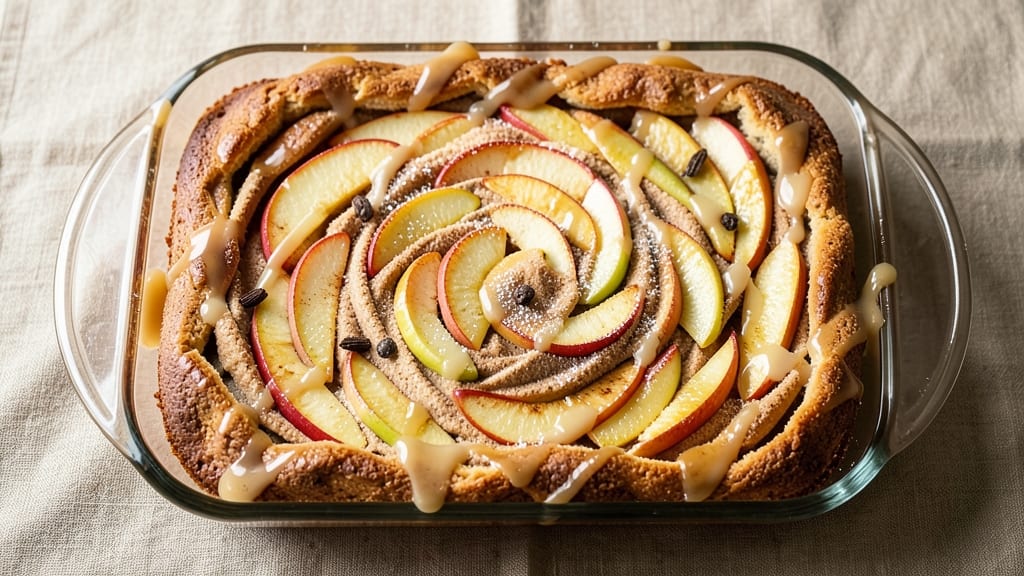
This apple pie sheet cake recipe combines the nostalgic warmth of classic apple pie with the convenience of a single-layer cake—perfect for gatherings or satisfying cravings.
The secret lies in a buttery, flaky crust that encases a spiced apple filling, baked until the edges are golden and the aroma fills your kitchen. I’ve perfected this recipe to deliver that comforting, home-baked flavor without the fuss of traditional pie assembly.
The filling is where the magic happens: tender apples tossed with cinnamon, nutmeg, and a touch of brown sugar create a warm, caramelized center that stays moist even after cooling.
The crust, whether you choose a traditional shortbread or a lighter cake base, provides the perfect contrast—crispy yet tender, with just enough buttery richness to complement the spiced apples. Baking times are streamlined to ensure even cooking, so you won’t spend hours waiting for the perfect slice.
What makes this recipe stand out is its versatility—serve it warm with a scoop of vanilla ice cream, dusted with powdered sugar, or topped with a lattice crust for a showstopping presentation.
The golden-brown edges and fragrant filling will have everyone asking for seconds, while the sheet cake format makes it easy to cut and share. Whether you’re hosting a dinner party or craving a cozy dessert, this recipe delivers restaurant-quality results at home.
Ready in under an hour, this apple pie sheet cake is ideal for those who love the flavors of apple pie but prefer a simpler, more approachable dessert. The instructions are clear, the ingredients are straightforward, and the outcome is undeniably satisfying. Let’s get baking!
Ingredients for apple pie sheet cake
The perfect blend of buttery crust and spiced apples—everything you need for that nostalgic dessert experience.
| Ingredient | Amount | Notes |
|---|---|---|
| All-Purpose Flour 🌾 | 2 ½ cups | Sifted for light texture |
| Unsalted Butter 🧈 | 1 cup | Cold, cubed for flaky crust |
| Granulated Sugar 🍚 | ¾ cup | White or light brown |
| Light Brown Sugar 🍚 | ½ cup | Packed firmly for moisture |
| Large Eggs 🥚 | 2 whole | Room temperature for even mixing |
| Vanilla Extract 🍯 | 1 tbsp | Pure extract preferred |
| Baking Powder 🧂 | 2 tsp | Aluminum-free for best rise |
| Ground Cinnamon 🌿 | 1 ½ tsp | Freshly ground for warmth |
| Ground Nutmeg 🌿 | ¼ tsp | Freshly grated preferred |
| Salt 🧂 | ½ tsp | Diamond Crystal preferred |
| Honeycrisp Apples 🍎 | 4 medium | Peeled, cored, sliced thin |
| Lemon Juice 🍋 | 1 tbsp | Freshly squeezed for brightness |
| Powdered Sugar 🍚 | ¼ cup | For dusting finished cake |
| Vanilla Ice Cream 🍦 | 1 cup | Optional serving suggestion |
The apples are non-negotiable here—Honeycrisp or Granny Smith hold their shape best and caramelize beautifully. Local farmers markets often have the freshest varieties, but the grocery store works too if you pick firm, unblemished fruit. Avoid Red Delicious—they turn mushy. Peel and slice them just before baking to prevent browning. For the butter, Plugrá or Land O’Lakes unsalted are my go-tos, but any cold, high-fat butter will work. The key is keeping it cold until the last minute to ensure that perfect flaky crust.
No Honeycrisp? Fuji or Gala are solid backups, though they’ll be slightly softer. Running short on vanilla extract? Almond extract at half the amount adds depth without overpowering. The powdered sugar is purely decorative—skip it if you prefer a rustic finish. For a lattice crust, use the same dough and cut it into strips (store-bought pie crust works too). The ice cream is optional but highly recommended—Breyers vanilla or Ben & Jerry’s Phish Food both pair beautifully with the warm cake. Pro tip: Toss the apples with a pinch of salt before baking—it enhances their natural sweetness.
This cake keeps beautifully for 3 days at room temperature, wrapped tightly in plastic. For longer storage, refrigerate for up to 5 days or freeze for 3 months. Reheat slices in the oven at 350°F for 5-7 minutes to restore that fresh-baked warmth. The crust stays crispy when stored properly, so don’t worry about it getting soggy. I always make a double batch—one for immediate serving and one to freeze for lazy weeknights.
Why You'll Love This Recipe
- Sheet Pan Magic: I swear by this recipe when I’m too tired to roll dough—just mix, spread, and bake. The butter and sugars melt into that perfect caramelized crust without a single pie dish in sight.
- Caramelized Edge: That crispy, buttery rim? It’s the brown sugar and butter working their magic. One bite and you’ll forget it’s a cake until the apples hit—then it’s pure comfort in every forkful.
- Breakfast to Brunch: Honestly, this is my lazy weekend hero. Serve it warm with ice cream for dessert or cut into squares for a quick breakfast with yogurt. The apples hold up better than I expected—no soggy mess.
- Budget Baking: Flour, butter, sugar—these are pantry staples that don’t break the bank. Plus, the leftovers? They last days if you store them right. My kids beg for seconds, and my wallet stays happy.
Step-by-step instructions for apple pie sheet cake
This hybrid dessert delivers all the cozy apple pie flavors in a convenient sheet cake form.
Prepare the Apple Filling
Peel, core, and slice the 4 medium Honeycrisp apples into ¼-inch thick slices. Toss them immediately with 1 tablespoon lemon juice to prevent browning. This preserves their vibrant color and bright flavor in the finished cake.
In a medium bowl, combine the sliced apples with 0.75 cup granulated sugar, 0.5 cup light brown sugar, 1.5 teaspoons ground cinnamon, 0.25 teaspoon ground nutmeg, and 0.5 teaspoon salt. Toss gently until the apples are evenly coated. The sugar mixture will draw out their juices, creating a thick, aromatic filling. Let this sit for 10 minutes while you prepare the crust - this allows the flavors to meld and the apples to soften slightly.
Make the Buttery Crust
In a large mixing bowl, combine the 2.5 cups all-purpose flour, 2 teaspoons baking powder, and a pinch of salt. Whisk briefly to distribute the leavening agent. Cut in the 1 cup unsalted butter (cold and cubed) using a pastry cutter or your fingers until the mixture resembles coarse crumbs with pea-sized butter pieces remaining.
Add 2 whole large eggs (room temperature) one at a time, mixing just until combined. Stir in 1 tablespoon vanilla extract until the dough comes together. The dough should be slightly shaggy but hold when pressed. If it's too dry, add 1-2 teaspoons ice water; if too sticky, chill for 15 minutes before proceeding. This crust needs to be firm enough to hold its shape but pliable enough to spread evenly.
Assemble and Bake the Cake
Preheat your oven to 375°F and line a 12x17-inch jelly roll pan with parchment paper, leaving an overhang on two long sides for easy removal. Press the dough evenly into the prepared pan, using your fingers or a rolling pin to create an even ¼-inch thick crust. The edges should be slightly thicker than the center to prevent over-browning.
Spread the prepared apple filling evenly over the crust, pressing down gently to ensure good contact. Bake for 35-40 minutes until the crust is deep golden brown and the filling is bubbling. The edges should pull away slightly from the pan, indicating it's fully set. If the top browns too quickly, tent loosely with aluminum foil after 20 minutes of baking.
Finish and Serve
Remove the cake from the oven and immediately dust the top with 0.25 cup powdered sugar using a fine-mesh sieve. This creates a delicate, snowy finish that contrasts beautifully with the warm spiced apples. Let the cake cool in the pan for 10 minutes, then transfer to a wire rack to cool completely.
For serving, cut into 8 equal squares using a sharp knife dipped in hot water between cuts. The cake is best served warm with 1 cup vanilla ice cream on the side. Each slice delivers the perfect balance of buttery crust, spiced apple filling, and creamy ice cream - all in one convenient package that's perfect for gatherings or cozy weeknight desserts.
Pro Tips For Making Apple Pie Sheet Cake
- Use Cold Butter, Not Soft: I learned this the hard way—creaming butter that’s too warm turns your cake greasy instead of fluffy. Take the butter straight from the fridge (yes, even in summer) and let it sit for no more than 10 minutes before mixing. You want it to yield to a spoon but still hold its shape—this keeps the crumb light and the apples from sinking into a dense mess.
- Mix Dry Ingredients First: Skip the "add flour to butter" habit—this recipe rewards patience. Whisk your all-purpose flour, granulated sugar, and brown sugar together before cutting in the butter. That way, you avoid pockets of dry flour and ensure the apples get evenly distributed in a tender, not gritty, crumb. (Trust me, your first slice will taste noticeably better.)
- Don’t Overmix the Batter: I used to beat this like I was trying to win a baking contest, and every time, the cake turned out dense. Once the flour is just incorporated—think "shag carpet" texture, not smooth dough—stop. Overmixing develops gluten, and your sheet cake will turn out more like a tough cookie than a melt-in-your-mouth treat. Two minutes past that point is two minutes too long.
- Press Apples Lightly, Not Hard: If you’re adding fresh apple filling (because, let’s be honest, you are), resist the urge to pack it down like you’re making a pie crust. Press the slices gently—just enough to hold them together—so they soften into the cake without turning it soggy. A spoonful of the brown sugar mixture sprinkled over the top before baking helps caramelize the edges without weighing it down. (Pro move: use a mix of tart and sweet apples, like Granny Smith + Honeycrisp.)
Perfect pairings for this recipe
Creamy Ice Cream
Nothing complements the warm spiced apples like a scoop of vanilla ice cream. I reach for Breyers vanilla or Ben & Jerry’s Phish Food—both have that perfect creamy texture that melts slightly against the cake’s warmth.
For a more indulgent twist, try salted caramel ice cream to enhance the apple’s natural sweetness. Serve with a warm slice of cake so the ice cream softens beautifully. 🍦
Caramel Sauce Drizzle
A homemade caramel sauce elevates this dessert to restaurant-quality. Simmer ½ cup heavy cream with ½ cup granulated sugar and 2 tablespoons unsalted butter until thickened, then drizzle over each slice.
For a quicker option, use store-bought salted caramel sauce like Trader Joe’s or Smucker’s. The salty-sweet contrast balances the spiced apples perfectly. 🍯
Whipped Cream Topping
Lightly sweetened whipped cream adds a cloud-like finish. I whip ½ cup heavy cream with 1 tablespoon powdered sugar and a pinch of vanilla extract until soft peaks form. Pipe or dollop onto each slice for an elegant touch.
For extra flair, dust with crushed cinnamon or toasted pecans. This topping keeps the cake feeling fresh and light. ✨
Spiced Coffee Pairing
A small cup of spiced coffee or chai latte cuts through the richness of the cake. Brew a dark roast with a dash of cinnamon or nutmeg to echo the cake’s flavors.
For a cozy vibe, add a splash of vanilla syrup or caramel drizzle. The warmth of the coffee enhances the apple pie’s nostalgic comfort. ☕
Lattice Crust Upgrade
For a showstopping presentation, replace the flat crust with a lattice topping. Use the same dough to cut ¼-inch strips, then weave them over the filling in a classic lattice pattern.
Brush with egg wash before baking for extra shine. This adds texture and makes the cake look like a mini apple pie—perfect for special occasions. 🌟
Fresh Fruit Accents
Add a bright contrast with fresh fruit. Top slices with thin apple slices, sliced pear, or raspberries for a pop of color. A sprinkle of toasted almonds or pecans adds crunch. These accents keep the dessert feeling fresh while complementing the warm spiced filling. 🍎
Nutrition facts
Frequently asked questions
Can I use store-bought pie crust instead of making the dough?
For convenience, use a 9-inch refrigerated pie crust (like Pillsbury) and press it into your 12x17-inch pan. Roll it out to ¼-inch thickness and trim the edges. The flavor won't be identical, but it saves time while still delivering that classic apple pie taste. Just brush the crust with egg wash before baking for extra browning.
What if my apples turn mushy during baking?
Mushy apples happen when they're too soft before baking or overcooked. Use firmer varieties like Granny Smith or Fuji, and slice them ¼-inch thick (not thinner). Bake for exactly 35-40 minutes—no longer! The filling should be tender but still hold its shape. If it's still too wet, increase the oven temp to 390°F for the last 5 minutes.
How do I make this gluten-free?
Replace the all-purpose flour with a 1:1 gluten-free baking flour blend (like Bob's Red Mill) and add ½ teaspoon xanthan gum to improve texture. Use gluten-free baking powder too. The crust will be slightly denser, but the spiced apple filling remains delicious. Chill the dough for 20 minutes before pressing into the pan for easier handling.
Can I bake this in a regular 9x13-inch pan?
Yes, but the proportions will change. Use 2 cups flour for the crust and reduce apples to 3 medium. Bake at 375°F for 25-30 minutes. The smaller pan means thicker slices, so watch for doneness at 25 minutes. The crust edges may brown faster—cover loosely with foil if needed. You'll get about 6-8 smaller squares instead of 8 larger ones.
Why does my crust get soggy?
Soggy crusts usually happen from steam or underbaking.